Table of Contents
Introduction
This guide will cover how to restrict WordPress Admin access by IP address with .htaccess file.
Securing your WordPress website is a top priority to protect it from unauthorized access and potential threats. One effective way to enhance security is by restricting access to the WordPress admin area based on IP addresses using the .htaccess file. In this comprehensive guide, we'll walk you through the process of configuring your .htaccess file to restrict access to the WordPress admin by IP address. By the end of this tutorial, you'll have a powerful security measure in place to safeguard your WordPress site.
1. Understanding the Importance of IP-Based Access Control
Why Restrict WordPress Access by IP Address?
The WordPress admin area is a prime target for hackers and malicious bots attempting to gain unauthorized access to your website. By implementing IP-based access control, you create an additional layer of security, allowing only specified IP addresses to access the admin panel while blocking all others. This proactive approach helps prevent brute-force attacks, unauthorized login attempts, and potential security breaches.
Benefits of IP-Based Access Control
- Enhanced Security: Limiting access to trusted IP addresses reduces the attack surface and minimizes the risk of unauthorized access.
- Protection Against Brute-Force Attacks: By blocking all IP addresses except those you specify, you effectively thwart brute-force login attempts.
- Peace of Mind: Knowing that only authorized personnel can access your WordPress admin area adds an extra layer of confidence in your website's security.
In the following sections, we will guide you through the process of setting up IP-based access control using the .htaccess file, step by step.
2. Accessing and Editing Your .htaccess File
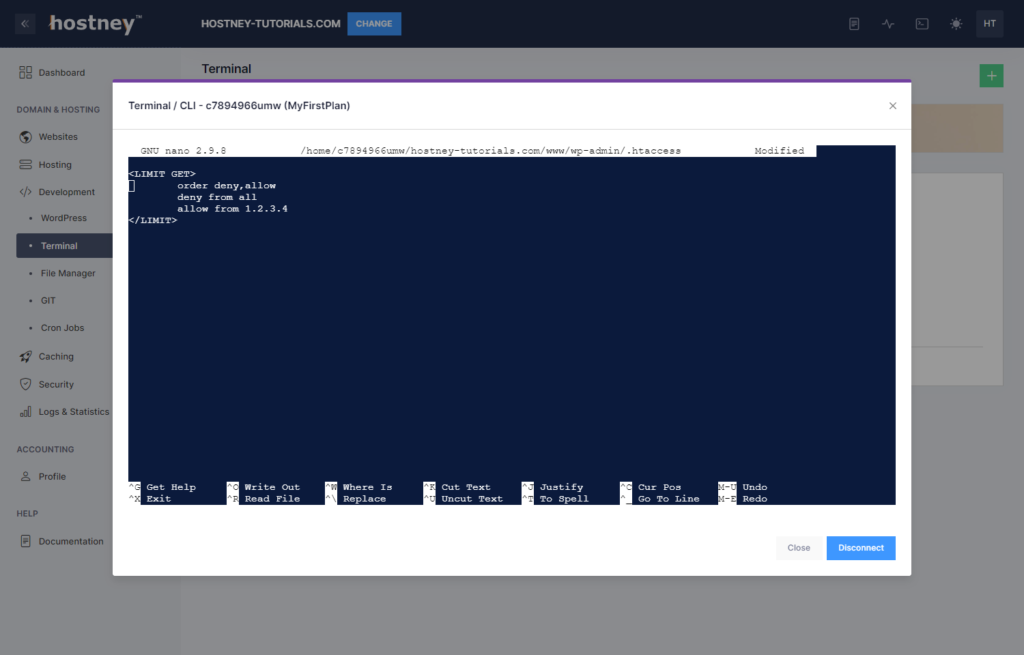
Before you can implement IP-based access control, you need to access your WordPress site's .htaccess file. Here's how to find it:
- Using the command line
- Type in the following command:
nano /path/to/your/wp-admin/.htaccess
- Using an FTP Client:
- Connect to your web server using an FTP client like FileZilla.
- Navigate to the root directory of your WordPress installation.
- From here, navigate to the wp-admin directory.
- Enabling Hidden Files in Your FTP Client:
- Note that the
.htaccessfile is a hidden file. In many FTP clients and file managers, you may need to enable the display of hidden files to see it.
- Note that the
Note that by default, there is no .htaccess file present under your wp-admin directory, so you will have to create a new file.
3. Allowing Specific IP Addresses
Adding IP-Based Access Control
To allow access to the WordPress admin area from specific IP addresses, you'll need to add code to your .htaccess file. Here's a basic example:
<LIMIT GET>
        order deny,allow
        deny from all
        allow from 1.2.3.4
</LIMIT>
In the code above:
<LIMIT GET>: This restricts the access control to the/wp-admin/ directory, which contains the login page and much more.order deny,allow: Sets the order in which access control rules are evaluated. First, it denies all access, and then it allows access from specified IP addresses.allow from 1.2.3.4: Allows access from a specific IP address (replace with the IP address you want to grant access to). You can easily check your public IP address by searching 'what is my IP' on Google.
You can add multiple allow from lines to permit access from multiple IP addresses.
4. Testing Your IP-Based Access Control
Verifying Your Configuration
After adding the IP-based access control rules to your .htaccess file, it's essential to test your configuration to ensure it works as intended. Here's how:
Access from Allowed IP Address
- Attempt to access the WordPress admin area from an IP address that you've allowed in your .htaccess file. You should be able to log in without any issues.
Access from Denied IP Address
- Try accessing the admin area from an IP address that is not listed in your .htaccess file. You should see a "403 Forbidden" error, indicating that access is denied.
Here are a few ideas on how to test access from a denied IP address:
- Use a VPN Client to change your public IP address.
- Download the Opera Browser and use their free in-browser VPN to change your public IP address.
- You can use the internet provided by your mobile phone carrier.
Testing your configuration with both allowed and denied IP addresses ensures that your access control rules are working correctly.
5. Managing Multiple IP Addresses
Handling Multiple Authorized Users
If you need to grant access to multiple IP addresses, you can simply add more allow from directives to your .htaccess file. Here's an example of how to structure it:
<LIMIT GET>
        order deny,allow
        deny from all
        allow from 1.2.3.4
        allow from 2.3.4.5
</LIMIT>
You can continue adding as many allow from lines as needed to accommodate all authorized users. Ensure proper indentation and syntax in your .htaccess file.
6. Using .htpasswd for Additional Authentication
Strengthening Security with .htpasswd
While IP-based access control provides robust security, you can further enhance it by implementing additional authentication using the .htpasswd file. This adds a layer of username and password authentication on top of IP restrictions. Here's a brief overview of how to do it:
1. Create a .htpasswd File
- Use a command-line tool like htpasswd generator to create a
.htpasswdfile. This file stores usernames and their corresponding hashed passwords.
2. Add .htaccess Rules
- Modify your .htaccess file to include rules for using the
.htpasswdfile. For example:
# Use .htpasswd for additional authentication
AuthType Basic
AuthName "Restricted Area"
AuthUserFile /path/to/.htpasswd
Require valid-user
3. Secure the .htpasswd File
- Ensure that the
.htpasswdfile is stored in a secure location on your server, as it contains sensitive data. It is recommended to place it outside of your public_html directory.
By combining IP-based access control with .htpasswd authentication, you create a formidable barrier against unauthorized access to your WordPress admin area.
7. Best Practices for Maintaining Security
Ongoing Security Maintenance
Maintaining a secure WordPress website requires ongoing vigilance. Here are some best practices to follow:
- Regularly Update Allowed IP Addresses: If your authorized users change or new team members join, promptly update your .htaccess file with the latest IP addresses.
- Monitor Access Logs: Regularly review your server's access logs to detect any suspicious activity or unauthorized login attempts. This helps you identify and address security threats early.
Conclusion
In this comprehensive guide, you've learned how to enhance the security of your WordPress website by restricting access to the admin area based on IP addresses using the .htaccess file. This security measure adds an additional layer of protection against unauthorized access, brute-force attacks, and potential security breaches.
Check out WordPress.org for additional information.
To learn about safeguarding WordPress, take a look at our comprehensive guide on "How to Protect WordPress".