
Table of Contents
Before proceeding with this mini-guide, it is assumed that you have already set up and have a functional Virtual Host. If you haven't done so, please consult the Virtual Host or Quick Start guides for detailed information.
Deploy
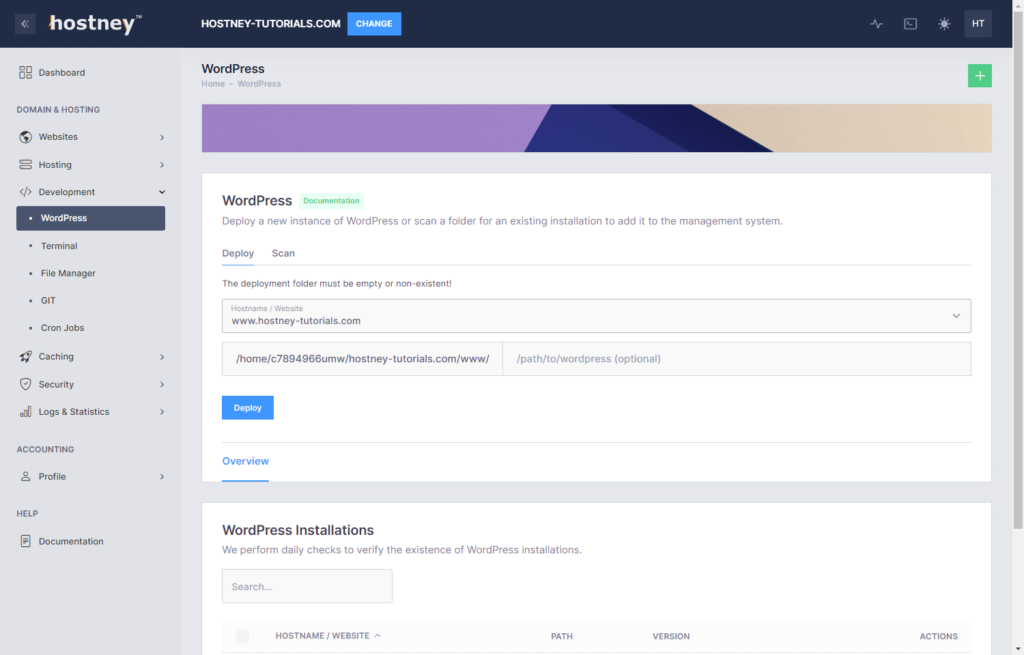
To initiate the WordPress deployment process, navigate to "Development" > "WordPress".
From the dropdown menu, choose your website, and the document root of your website will be automatically filled. If you intend to deploy WordPress in the root folder, you can leave the optional path field blank.
Important Note: Ensure that the directory where you plan to deploy WordPress is either empty or non-existent; otherwise, the deployment process will fail.
That's it, you are all set.
Please note that we do not provide admin credentials. Instead, you can use passwordless authentication by hovering over the "Action" button. Once you log into WordPress, you will have the option to reset your password.
If you require a temporary URL to access your website, you can find the HUC (Hostney User Content) URL for your website under "Virtual Hosts."
Scan
If you set up WordPress without the auto-deploy feature or accidentally unregistered your site, you can easily scan a specific folder for existing WordPress installations.
To do this, navigate to the "Scan" tab, select your website, provide the path (if any), and click on "Scan". This action will retrieve the website information and register it with Hostney.
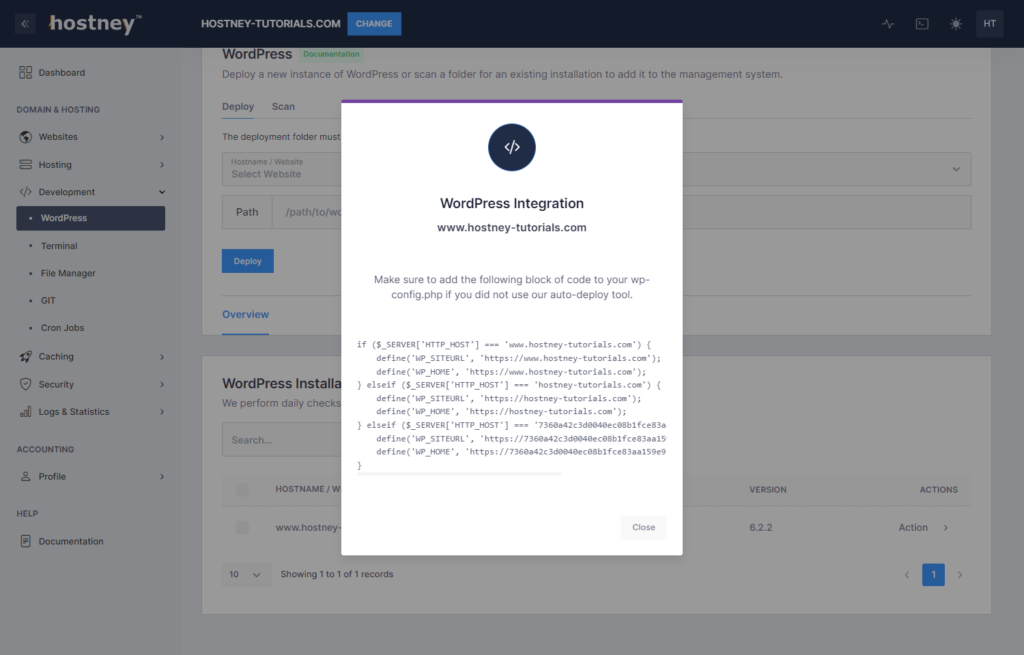
You don't need to install any WordPress plugins to make this integration work with Hostney's control panel. However, ensure that you have correctly set the WP_SITEURL and WP_HOME variables in your wp-config.php file.
Example (DO NOT COPY/PASTE):
<?php

if ($_SERVER['HTTP_HOST'] === 'www.hostney-tutorials.com') {
    define('WP_SITEURL', 'https://www.hostney-tutorials.com');
    define('WP_HOME', 'https://www.hostney-tutorials.com');
}
elseif ($_SERVER['HTTP_HOST'] === 'hostney-tutorials.com') {
    define('WP_SITEURL', 'https://hostney-tutorials.com');
    define('WP_HOME', 'https://hostney-tutorials.com');
}
elseif ($_SERVER['HTTP_HOST'] === '7360a42c3d0040ec08b1fce83aa159e9.hostneyusercontent.com') {
    define('WP_SITEURL', 'https://7360a42c3d0040ec08b1fce83aa159e9.hostneyusercontent.com');
    define('WP_HOME', 'https://7360a42c3d0040ec08b1fce83aa159e9.hostneyusercontent.com');
}

... rest of your code ...
After your scan is finished, you will receive the exact code snippet for your website under "Action" > "Integration". Make sure to include this code in your wp-config.php file.
Admin Login
If your WordPress integration is set up properly (you used our tool to deploy your website or followed the steps in the Scan Section), the Admin Login feature should grant you passwordless access to your website.
Deactivate All Plugins
This feature is self-explanatory. Sometimes WordPress updates go south, and this feature may help you regain access to your site's admin panel to start troubleshooting.
Unregister
Use this option if you want to remove your WordPress site from the management system. This feature will NOT delete your website.