Table of Contents
Introduction
Website data is an invaluable asset, and having the ability to restore WordPress from backups is an essential skill for any webmaster. In this comprehensive guide, we will walk you through the intricate process of manually restoring your WordPress site using a tarball archive and a MySQL dump file via the command line. While there are numerous automated solutions available, understanding the manual process grants you greater control and knowledge over your website's data, ensuring its security and integrity.
1. Preparation
Before embarking on the restoration journey, it's crucial to ensure you have the necessary backups and access to your server's command-line interface.
Backup Verification
Begin by confirming the presence of the required backup files: a tarball archive containing your website files (backup.tar.gz) and a MySQL dump file (backup.sql) for your database. It's imperative that these files are not only present but also intact and ready for restoration when needed.
Accessing the Command Line
To access your server's command line via SSH, follow the detailed steps outlined in our previous guide on 'How to Back Up WordPress Manually.' This will ensure you have the necessary access and permissions to proceed confidently.
Disable NGINX Caching
Before you continue, be sure to deactivate NGINX caching through your Hostney Control Panel.
2. Restore WordPress Files from the Tarball
In this section, we will focus on the meticulous process of restoring your website files from the tarball archive.
Uploading and Extracting
Start by creating a dedicated directory in the root of your home directory on the web server, preferably named 'Recovery.' Here, you'll upload the backup.tar.gz file. Then, switch to your SSH command-line tool, navigate to the 'Recovery' folder, and execute the extraction command:
cd /path/to/your/Recovery
tar -xzvf backup.tar.gz
This action will meticulously unpack your website files into the current directory, preserving their structure and integrity.
Setting Permissions
Once extraction is complete, it's crucial to ensure that file permissions are appropriately set to secure your website's functionality. Use the chmod command to adjust permissions as needed:
find /path/to/your/Recovery -type d -exec chmod 755 {} \;
find /path/to/your/Recovery -type f -exec chmod 644 {} \;
Replace /path/to/your/Recovery with the actual path to your recovery directory.
3. Restore WordPress Database from MySQL Dump
Now, let's delve into the process of restoring your WordPress database using the MySQL dump file.
Database Creation
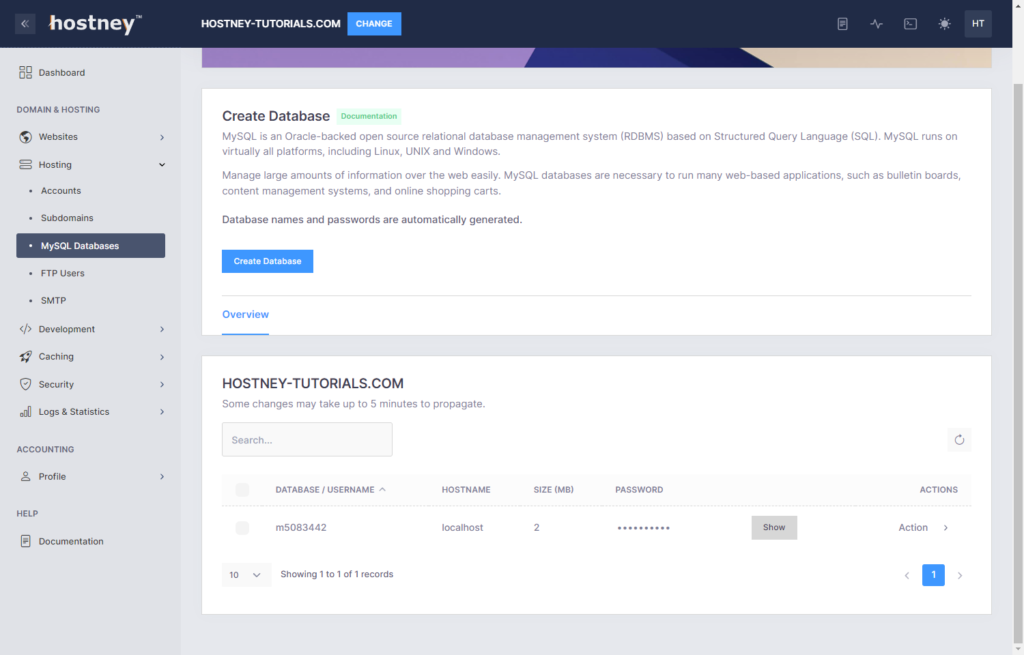
Initiate the restoration by creating a new database via your Hostney Control Panel's 'MySQL Databases' section. This dedicated database will serve as the repository for your website's data.

Importing Data
With the database in place, execute the following command to import your data from the backup.sql file:
mysql -u your_username -p your_database_name < backup.sql
You'll be prompted to enter your MySQL password. This step ensures that your website's data is meticulously reinstated.
4. Update WordPress Configuration
To ensure seamless connectivity between WordPress and the newly restored database, update your WordPress configuration file.
wp-config.php
Open your wp-config.php file and update it to reflect the new database credentials. This involves replacing the database name, username, and password with the newly created database's details. By maintaining accurate configuration, you guarantee a smooth transition for your website.
nano /path/to/your/Recovery/wp-config.php
5. Move Your Recovered Data to Production
Now that your website data, file and folder permissions, and your MySQL database have been restored, it's time to transition your files to the production environment.
Renaming and Relocating
Initiate this transition by renaming your website's root directory using the following command:
mv /path/to/your/website/root/directory /path/to/your/website/root/directory_old
Subsequently, rename and relocate your 'Recovery' folder to the original website root directory location:
mv /path/to/your/Recovery /path/to/your/website/root/directory
This step finalizes the transition of your recovered data to the production environment.
6. Check the Website
After the intricate restoration process, it's imperative to thoroughly test your website's functionality.
Testing and Validation
Visit your website to ensure that all aspects function seamlessly. Conduct thorough tests on various pages, posts, and functionalities to validate that the restoration process was executed flawlessly. Additionally, log in to your WordPress admin panel to confirm access to admin-level features.
7. Delete Archive Files
To uphold security standards, it's vital to remove the tarball and dump files post-restoration.
Security Measures
Execute the following commands to securely delete the tarball and dump files:
rm /path/to/your/website/root/directory/backup.tar.gz
rm /path/to/your/website/root/directory/backup.sql
These actions ensure that sensitive backup files are no longer accessible.
Conclusion
By following these detailed steps, you can confidently and expertly restore WordPress from a tarball and MySQL dump file via the command line. This process not only provides you with exceptional control and understanding of your website's data but also ensures a seamless recovery process in the face of unexpected events.
We hope that this guide has helped you easily restore WordPress and simplify the command line approach.
If you need to restore WordPress using an automated process, Hostney's backups can help you easily restore your files and databases. Additionally, you have the option to use the 'File Recovery' tool to restore a missing file, the WordPress platform, or a database.
Discover an in-depth guide with an alternative approach on WPBeginner.com.
Not a customer yet? Try our free 30-day trial without any commitment!